RS3100 Barn Find Restoration
 Ford Capri Mk1 RS3100 Facelift Barn Find Restoration
Read the full write-up at Ford Capri Mk1 RS3100 Facelift Barn Find Restoration ↗
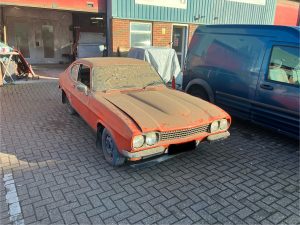 Photo: Ford Capri Mk1 RS3100 Facelift Barn Find Restoration
Barn-find Ford Capri Mk1 RS3100 undergoing full structural restoration
A matching-numbers Capri RS3100 that had been laid up since 1995 is being stripped and rebuilt by Andys Autobody. The shell was media blasted to reveal heavy corrosion in all four corners, and the team is now fabricating and fitting new structural panels, including floor, sills and bulkhead sections, with the car mounted on a rollover jig.
Parts used
Parts named as used in the original write-up, grouped the way the Parts page groups them. Where one of the shops we index lists the same thing for this car, it is shown underneath with a link to the shop.
Body & Trim 1
- Replacement structural body panelsEx-pressed Steel Panels
New panels fitted to replace corroded sections including floor, sills and bulkhead lower section
In the shops Outer Body Panels ↗
 Moss Motors – Triumph TR6/TR250· $0.00 USD
 Rear Body Panel, Lower ↗Moss Motors – Triumph TR6/TR250· $210.39 USD
Photos
40 pictures collected from the write-up, in the order they were posted, shown from Ford Capri Mk1 RS3100 Facelift Barn Find Restoration. A picture opens larger here, with the way through to the page it is on.
How it was done
Starting condition
The RS3100 had been off the road since 1995 and was missing some key RS parts, notably the duck tail spoiler, which the owner expects will be hard to source. It is described as a matching numbers car that had long been a project the owner wanted to restore.
Stripping and blasting
The car was stripped and sent for media blasting. Once blasted and coated in epoxy primer, the full extent of the corrosion became visible, allowing the team to list which panels needed replacement. Corrosion was found in all four corners, typical for Mk1 Capris, but the car had avoided repeated MOT patch repairs since it had been off the road so long.
Parts cataloguing and outsourcing
Once the shell was assessed, parts were catalogued and photographed before being sent out to specialists for plating, chroming and powdercoating.
Panel fabrication and bracing
New panels arrived from Ex-pressed Steel Panels. Before fabrication began, bracing was added to the shell to keep it straight while structural panels were replaced, since so many needed renewal.
Mounting on the rollover jig
The nearside rear bumper mount needed repair before brackets for the rollover jig could be fitted. Once mounted, work began on making the cabin area structurally sound before moving to the front and rear sections.
Floor pan and bulkhead repair
The original floor pan was removed, with mounting brackets cleaned, blasted, treated and welded onto the new floor pan. The corroded lower bulkhead section was replaced first, since the floor pan sits over its lip. The new floor pan was then adjusted and welded into place.
Sill replacement
With the nearside floor pan completed, work moved on to replacing the inner and outer sills.
A summary in our own words. The full account, with all its detail, is in the original write-up: read it at Ford Capri Mk1 RS3100 Facelift Barn Find Restoration ↗