Owner's Mk1 Capri X-pack Restoration (Facelift with MK3 floor transplant)
 Mk 1 Capri X-pack restoration – Andys Auto Body
Read the full write-up at Mk 1 Capri X-pack restoration – Andys Auto Body ↗
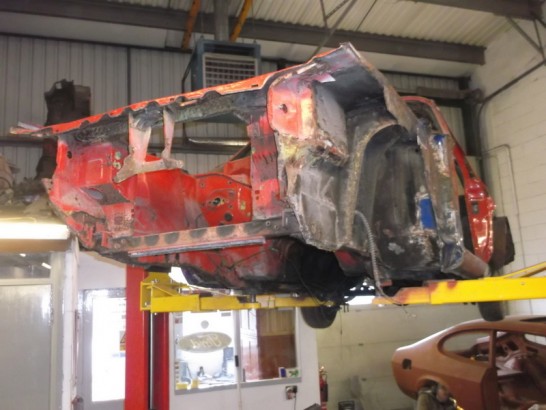 Photo: Mk 1 Capri X-pack restoration – Andys Auto Body
Mk1 Capri X-pack rebuilt with a Mk3 floor and inner wings
The owner rediscovered his own former Facelift Capri X-pack in a breakers yard decades after selling it, bought it back and found the body far more corroded than expected. Rather than source a full set of Mk1 panels, the restoration grafts a donor Mk3 floor pan and inner wings onto the surviving Mk1 upper body, as the two chassis are almost identical. The write-up documents the cutting, fabrication and welding needed to join the two cars into one shell.
Specs
As stated in the original write-up.
- Body kit
- New X-pack body kit
- Floor pan
- Donor Mk3 Capri (Laser) floor pan
- Inner wings
- Donor Mk3 Capri inner wings
Parts used
Parts named as used in the original write-up, grouped the way the Parts page groups them. Where one of the shops we index lists the same thing for this car, it is shown underneath with a link to the shop.
Body & Trim 3
- X-pack body kit
New wide-arch kit fitted to the restored shell
- Mk3 Capri floor panMk3 Capri Laser donor
Donor floor grafted in place of the corroded Mk1 floor
In the shops Left Floor Pan ↗
 Moss Motors – Triumph TR6/TR250· $504.95 USD
 Right Floor Pan ↗Moss Motors – Triumph TR6/TR250· $504.95 USD
 Right Floor Pan ↗Moss Motors – Triumph TR6/TR250· $454.25 USD
- Mk3 Capri inner wingsMk3 Capri Laser donor
Donor inner wings joined to the Mk1 front structure with a fabricated interim section
In the shops Rear Inner Wing TR6 LH ↗
 TRGB· £219.95 GBP
 TR6 Rear Inner Wing R/H ↗TRGB· £219.95 GBP
 TR6 Front Inner Wing L/H ↗TRGB· £230.95 GBP
Photos
40 pictures collected from the write-up, in the order they were posted, shown from Mk 1 Capri X-pack restoration – Andys Auto Body. A picture opens larger here, with the way through to the page it is on.
How it was done
Starting condition
The owner found his old Facelift Capri X-pack discarded in a breakers yard decades after selling it. After buying it back and shipping it home, stripping off the kit revealed severe corrosion, with the chassis collapsed at the front. An earlier repair attempt at a local garage was abandoned as unsatisfactory.
Decision to use a Mk3 floor
Given the cost and number of panels needed, it was suggested to fit a floor pan and inner wings from a Mk3 Capri, since the Mk1 facelift floor and chassis are almost identical. The car arrived stripped, with a donor Mk3 Laser floor pan and inner wings, extra panels, and a new X-pack kit.
Cutting back the shell
All rotten sections were removed, leaving only the roof, inner A-posts, outer quarters, rear bulkhead and scuttle panel from the original Mk1 shell. The Mk3 floor needed only minor repairs and trimming before fitting.
Joining the two shells
The Mk1 upper body was lowered onto the Mk3 floor, with measurements and alignment checked before welding the two halves together. The front inner wings and slam panel were then joined to the Mk3 inner wings, with corroded sections rebuilt and an interim fabricated section used to bridge differences between Mk1 and Mk3 wing shapes.
Rear end and boot floor work
Salvaged Mk1 boot floor sections were grafted onto the Mk3 floor and chassis, with new drop side panels fabricated and fitted. A temporary rear panel was used to help align the rear quarters while they were repaired, and wheel tub sections were fabricated and fitted for the X-pack arches.
A summary in our own words. The full account, with all its detail, is in the original write-up: read it at Mk 1 Capri X-pack restoration – Andys Auto Body ↗