Lucy: Dave's Mini rear subframe replacement
My Mini Project
Dave's 1990 Mini City E: replacing the rear subframe
Dave, owner of a 1990 Mini City E nicknamed Lucy, documents a full rear subframe replacement across several site parts, along with earlier bodywork, brake, and wheel arch work. The write-up gives practical step-by-step detail on removing and refitting the subframe, radius arms and exhaust, drawn from hands-on experience that went beyond the Haynes and Mini Restoration manuals.
Specs
As stated in the original write-up.
- Model
- 1990 Mini City E, 998cc A-series
- Brakes
- Rear drum brakes with new shoes and cylinders
- Exhaust
- RC40-based Stage 1 kit fitted to rear subframe
- Wheel arches
- Group 2 fibreglass wide arches with black side trims
Parts used
Parts named as used in the original write-up, grouped the way the Parts page groups them. Where one of the shops we index lists the same thing for this car, it is shown underneath with a link to the shop.
Fuel & Ignition 2
- Fuel line and breather pipe
Replaced with new pipe and jubilee clips after finding splits and nicks
In the shops Fuel Pipe Double Male In-Line Union ↗
 TRGB· £9.85 GBP
- RC40 exhaust and mounting kitMini Spares
Stage 1 exhaust kit fitted to the rear subframe, mounted using old bolts and copper slip
In the shops Mini RC40 Twin Box Exhaust ↗
Angloparts· €143.30 EUR
Mini RC40 Rear Box (Single) ↗Mini RC40 Pipe to Single Box ↗
Gearbox & Drivetrain 1
- Rear subframe
Removed, overhauled and refitted with radius arms and trunnions
Suspension & Steering 1
- Radius arms
Overhauled, greased and refitted to the rear subframe
In the shops Radius Arm ↗
 Moss Motors – Triumph TR6/TR250· $61.99 USD
 Radius Arm Mount ↗Moss Motors – Triumph TR6/TR250· $149.69 USD
 Radius Arm Shaft ↗Moss Motors – Triumph TR6/TR250· $20.99 USD
Brakes 3
- Rear brake shoes
Replaced after fluid contamination from a leaking cylinder
In the shops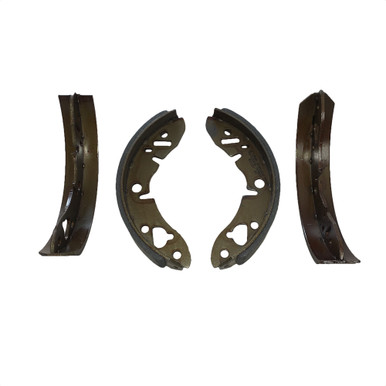 Rear Brake Shoe Set, Premium ↗
 bpnorthwest.com· $61.56 USD
 Rear Brake Shoes (Herald/Spitfire) ↗TRGB· £14.25 GBP
 TR3-6 Rear Brake Shoe Return Spring ↗TRGB· £3.85 GBP
- Rear wheel cylinders
Replaced along with brake shoes
- Copper brake pipes and unions
Replaced corroded pipes that had seized to their unions
In the shops 5/16 Copper Washer for Brake Union/Oil Pipe ↗TRGB· £1.05 GBP
 Brake Pipe Union Double Male ↗TRGB· £4.68 GBP
 Copper Brake Pipe Kit - TR4 LHD ↗TRGB· £76.95 GBP
Wheels & Tyres 1
- Revolution wheels and Falken tyresRevolution; Falken
Fitted as a wheel and tyre package, prompting the need for wider arches
In the shops Revolution Grp4 Wheel Insert ↗
 C Bradley Motorsport· £4.29 GBP
 9.0x13 Revolution Competition Wheel ↗C Bradley Motorsport· £128.40 GBP
 8.0x13 Revolution Competition Wheel ↗C Bradley Motorsport· £123.50 GBP
Body & Trim 1
- Group 2 fibreglass wheel arches
Wider arches fitted with black side trims to cover 165-width tyres, after cutting, rust treatment and priming
Other 1
- Windscreen washer pipes and jet headsMini Spares
Replaced crushed pipe and worn jet head to fix poor washer dispersion
In the shops Windscreen Washer Jet ↗Moss Motors – Triumph TR6/TR250· $96.50 USD
Photos
24 pictures collected from the write-up, in the order they were posted, shown from My Mini Project. A picture opens larger here, with the way through to the page it is on.
The project 2this post at My Mini Project ↗
Rear brakes and welding 1this post at My Mini Project ↗
Replacing the rear subframe (part 1) 3this post at My Mini Project ↗
Overhauling the radius arms 1this post at My Mini Project ↗
Replacing the rear subframe (part 4) 1this post at My Mini Project ↗
Internal bonnet release 2this post at My Mini Project ↗
Replacing the rear wheel bearings 1this post at My Mini Project ↗
Mini disc brake caliper cleanup 2this post at My Mini Project ↗
Fitting Group 2 Wheel arches 3this post at My Mini Project ↗
Windscreen washers, more welding and handbrake cable adjustments 1this post at My Mini Project ↗
Minis in Japan 1this post at My Mini Project ↗
Rocker cover gasket 1this post at My Mini Project ↗
Fitting a Stage 1 kit - Part one - Removing the stock system 1this post at My Mini Project ↗
Fitting a Stage 1 kit - Part two - Fitting the RC40 based kit 1this post at My Mini Project ↗
Ressurection 2this post at My Mini Project ↗
Refusing to move 1this post at My Mini Project ↗
How it was done
Starting condition
The Mini City E had surface rust on a front wing and under the windscreen, loose pot-riveted wheel arch covers, black trim the owner disliked, and no sill trim. Tyres and wheel arches were otherwise in decent shape, so restoration was prioritised before cosmetic changes.
Rear brakes and welding
Contaminated rear brake shoes and leaking cylinders were replaced, along with corroded brake pipes that had seized to their unions. New copper pipes and DOT4 fluid were fitted, and the radius arms were greased, revealing the subframe would need removal and repainting.
Removing the rear subframe
The rear bumper, boot door, number plate light, exhaust, battery leads and petrol tank were removed to access the subframe. The bonnet was taken off for better access and light. This was a difficult job not well covered by published manuals, done with help from an experienced Mini enthusiast.
Refitting the subframe and suspension
With help from his father, Dave refitted the subframe, lining up trunnions and radius arms on each side, reconnecting brake pipes, and fitting the fuel line. Lessons learned included inserting the longer rear bolt first and using a jack and socket extension to align the smaller bolt.
Wheel arches and later MOT work
After fitting Revolution wheels and Falken tyres, standard arches proved too narrow, so Group 2 fibreglass arches were cut, treated for rust, primed and fitted. Later MOT work included welding repairs, handbrake adjustment and fixing a crushed windscreen washer pipe and worn jet head.
Fitting a Stage 1 exhaust kit
While fitting an RC40-based Stage 1 exhaust kit from Mini Spares, Dave found oil leaks and a split fuel tank hose, prompting tank removal and pipe replacement. He used Mini Forum guidance to work out the mounting kit layout since no instructions were supplied.
Long lay-up and deterioration
After roughly two years of inactivity, with only occasional engine runs, the car failed to start at all. Dave found worsening rust in the engine bay, door hinges, A-panels and sills, and a broken bonnet release cable, prompting him to sell off stockpiled spare parts.
A summary in our own words. The full account, with all its detail, is in the original write-up: read it at My Mini Project ↗
Worth knowing
- Insert the longer rear trunnion bolt before the front one when fitting radius arms
- Use a socket and extension on a trolley jack to line up the smaller front bolt hole
- Published Haynes and Mini Restoration manuals leave gaps on subframe removal that experienced help can fill